Monday, February 29, 2016

Assisi Embroidery

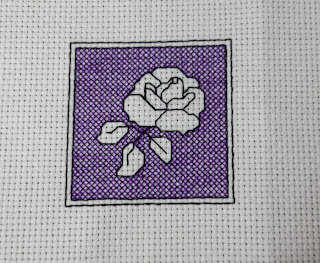
I don't participate in all guild activities, but I try to at least attend the Tuesday evening stitching and the monthly guild meeting. This month's meeting had a talk about Assisi Embroidery. We were given some patterns, a piece of fabric, some DMC black and another color of our choice. I'm on a purple kick right now so that's what I picked.


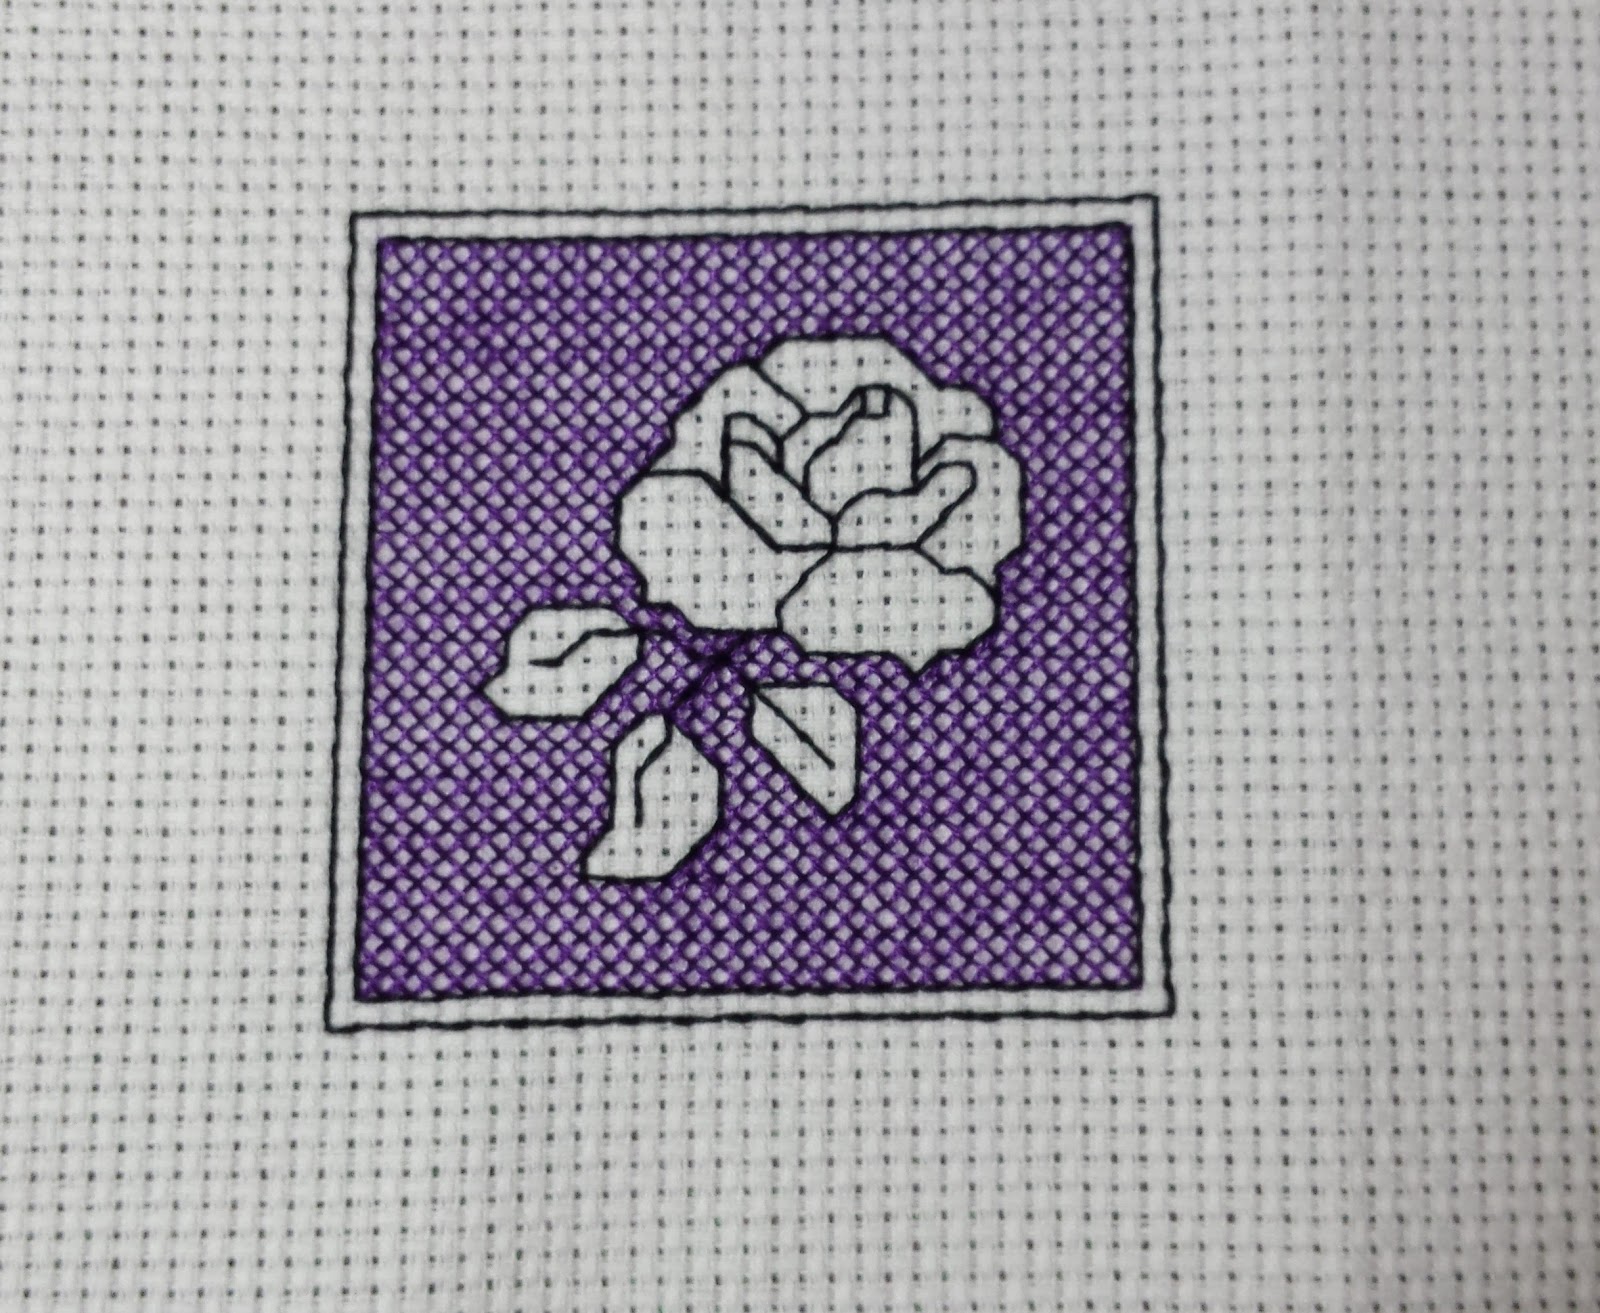
When I went home I did a quick search for all the things that were presented and found a few links that would be of interest:

  • This video demonstrating Assisi Embroidery
  • This one described it's history with some nice pictures

I confess I quite like this type of embroidery. Assisi Embroidery is stitched in two steps. The outline is stitched first with 1 strand of black in Holbein stitch (check out this link for an excellent tutorial on holbein stitch by Ajisai Press). Once the outline is finished, the background is filled with cross stitch using 1 strand of another color. This is the type of stitching I would take on a trip, once all the outline has been stitched.

Now if you've been tempted with all the nice pictures as I have, I managed to track down the patterns to stitch them :) You can buy most of these from this website (I quite like the pillow) or you can track down a copy of Thérèse de Dillmont's 1920 Assisi Embroideries which I've already done for you here (look for the word 'assisi' and you'll be able to download part 1 and 2).

Dillmont's book contains clear images of the designs which you'll have to turn into a pattern. Luckily Pinoy Stitch exists. They've already done all the pre-work so all you need to do is download and start stitching :)

Update: I found another link that describes how to do the Rolled Hem that's used to finish Assisi Embroidery. The tutorial is by Jeanine, her website covers all the different types of Italian embroidery. You'll notice that most of it is whitework :P

Tuesday, February 23, 2016

WIPocalypse 2016 – February


This month's theme is: If you have any of your pieces on display in your home which attracts the most plaudits? (via Hazel) I don't really have any pieces on display in my house. In my room you'll find various little amigurumis that I've crocheted or little stitched projects from the Creative Festival that have been "finished". I do have one framed piece that is hanging in my room. It's actually the only thing hanging on a wall in the entire house lol


I do have one more piece that is framed, but it's never been hung as my mom and I can't agree on a wall and I don't want to overcrowd my room walls. Maybe when I get sick of looking at Stargazer, I'll switch her out for the Peacock. But for now I'm happy with how things stand.


I'm still making excellent progress on Bramble and the Rose. I stitched on it for a few weekends.

Ink Circles - The Bramble and the Rose

Nothing new on Tracery Dragons.

No Update
Teresa Wentzler - Tracery Dragons

More eyelet stitching on Fantasy Lace. I managed to finish one more side at my guild stitching meeting. It's a small one, but its counts ;)

Satin Stitches - Donna's Fantasy Lace

In the last WIPocalypse post I had started Azure Tit and Blueberries.  I have since finished all the cross stitch and back stitch on the piece and finished cross stitching the next bird in the series Mountain Bluebird and Blackcurrant.

Ajisai Designs - Azure Tit and Blueberries

Ajisai Designs - Mountain Bluebird and Blackcurrant

Sunday, February 21, 2016

Mountain Blue Bird and Blackcurrant

In between stitching on Fandango, I've been also stitching on Mountain Blue Bird and Blackcurrant. I've been posting updates on my Instagram (check it out here). The stitching was finished Monday and back-stitching Thursday.


I've quite enjoyed stitching these pieces. They are very quick and the blues are gorgeous. I can't wait to work on the blackwork filling stitch.


And a picture of the back.


I will not be stitching the third blue bird (I think). I need to concentrate on my name tag and Fandango as well as my other WIPs.

Friday, February 19, 2016

Seminar 2016: Fandango Pre-work

I finally received my kit :) Our teacher Barbara Kershaw emailed me last Monday saying my kit was shipped Friday. Luckily I didn't have this information over the weekend or I would have expired from impatience ;) It was hard to finish my work day as it was as I knew this would be waiting for me at home.


The kit came with the fabric and one ball of #8 perle cotton with instructions for basting the fabric and the pre-work we were expected to do.


I used my usual basting threads which is light pink. It's probably not a good color choice against that white, but it works for me.


I usually baste the fabric 12 threads over and 8 threads under, but for this class we were shown how to baste over and under 2 threads. This works much faster than my methods. There is little chance of making counting mistakes while basting. We add small notches at after 5 lines which indicates 10 threads and a bigger notch after we'd done 10 of these indicating 100 threads.


Counting becomes much easier and I was ready to move onto the next step. I quickly realized there was a problem. I had basted my fabric the same way they do it in hardanger, where the horizontal and vertical lines cross on the underside of the fabric, which meant I had an extra thread on either side of my center.


Luckily my teacher was one email away and I was able to get clarification on the instructions. When using this basting instructions, the horizontal and vertical lines should cross at the center.


Not a big deal. I'm so anal about counting and re-counting, I'm not worried about the extra thread. Plus, once the center square is stitched everything else is counted from it and not the center. So I moved onto the next step. The final prep-work that was needed to be done was a square around the center which would be used as a guide to stitch the center square.


And the fun can begin :) I love satin stitching. I'm going to enjoy working on this project in the next months.

Monday, February 8, 2016

February TUSAL


I think wordless TUSAL was too confusing for everyone lol. So I guess I'll keep blathering about whatever in these posts. So this months was pretty busy. There's lots of purples and blues from Bramble and the Rose and my Azure Blue Tit. And around all that are scraps from my cashel fabric that kept coming out before finished the edges. I figured I'd add them in there since they're useless threads too.

I hope everyone had a good weekend :) Mine was very productive. I've been secretly stitching a name tag for when I go to Seminar in May. I've finished one side and I'm just working on the back piece. I'll post pictures once it's done, but it won't be for a while yet.

In the mean time, I started the second blue bird in the series. This is Mountain Bluebird and Blackcurrant.


I figured one project won't be enough for a 6-hour train ride and two 7-hour flights. I'm going to do the same thing I did with the other bird, which is do all the cross stitch and backstitch leaving the blackwork for the for later.


Monday, February 1, 2016

Azure Tit and Blueberries

In my last post I showed pictures of a new WIP I started. Here's a little history on the project.


I discovered Ajisai Press last year and absolutely fell in love with the designs. In particular the Birds and Berries collection in blue and red. Since then, there have been other designs released like Romantic Winter Blooms and the Butterfly collection. But let's concentrate on the stash that I do own for now.

In the fall, I bought this gigantic piece of 28 ct Confederate Gray Cashel Linen, enough so that I'd be able to stitch all 6 pieces on the same fabric. The reason for this is, when I saw the collection I imagined all 6 stitched, framed and hung in bedrooms with a blue room and a red one. This is all in my imaginary future house that I will own one day. The same house, where my Spirit of the Southwest will be hanging near an ocean colored them powder room. We're all allowed our dreams ;)

Back to Azure Tit. I toyed with the idea of stitching the pieces in reversible cross stitch. So I did the research and asked around for tips. Until I remembered, I plan on framing these pieces. No one will ever see the back of them. So I quickly dropped those plans, but here are the links I found for future reference or in case anyone is interested:


Since I was going to stick to plain old cross stitch, I quickly jumped in with both feet. It is a VERY quick stitch. Took about a week stitching part time to do it.


The next part was adding in the back-stitch which gives life to the azure tit bird. Even the blueberries look amazing and not like blue gumballs.


The back-stitch was done using the Holbein stitch which gives you a nice front and back (Ajisai Press has an excellent tutorial video here). This is why I wanted to try the reversible cross stitch. I keep dreaming that one day I'll stitch the perfect back.


That's all the stitching I will be doing on this piece for now. There is still the blackwork filling stitch to do, but I'm planning on taking this piece with me to work on in the train and plane in May. The next decision I need to make is if I want to stitch the Holbein stitch using one strand of regular DMC thread or #12 perl cotton to give it dimension.

Now that I've finished this one so fast, I'm wondering if I should stitch another one to take with me. You know, just in case I finish this one too fast ;)