Friday, March 31, 2017

Quiet Week

It's been very quiet on the stitching front this week. I had to work overtime on last Sunday, taking away my one full day of stitching and has been eating up all my evening time this week as well. 7 more days and then I will be on vacation. I can't wait to start packing!

I did manage to put in a few stitches on Hedebo Enchantment. I'm very close to finishing all the pre-work. I'm at the point of going around the four corners now. After that there is only the satin stitch border all around it.


I'm going to try and finish that this weekend. I also need to frame Eidelweiss this weekend as I'm taking it to Seminar for the members exhibition. I should have done that AGES ago, but I kept avoiding it. I can't do that anymore. Forms and pictures need to be submitted before I leave for my vacation next week.

One thing off my chest, I finished "finished" my secret project. I'm waiting for the weekend to take descent pictures so I can submit them and then I can share it on the blog. I will be writing a blog series on how I stitched the piece. It will probably be posted on Wednesdays as I prefer keeping Mondays for updates on weekend stitching. I'm very nervous as it's the first time I stitched a piece with no actual instructions from a teacher or designer. I hope you all like it :)

Monday, March 27, 2017

March TUSAL & WIPocalypse


This month I'm combining both TUSAL and WIPocalypse in one post. The reason being, I stitched A LOT but not on any of my WIPocalypse projects :P I did finish my secret project. It's officially off the hoop.


But I still can't share until it's been properly finished. I'm trying my hand at making my first pouch. I don't have a sewing machine so it's being hand stitched. Here is the inside lining.


Thursday, March 23, 2017

A Bear for Grace

Last month, I found out a co-worker was just about to have a baby. He already had two of each so they decided not to find out what they were having until the birth. This made it very hard to decide on what to make as a gift. I finally settled on a bear with blue, pink, yellow and white stripes. All nicely generic baby colors :)


The baby ended up being a girl named Grace. Her dad has been sharing pictures of her on Instagram and she's already a pro at taking selfies with her daddy.


We finally got the chance to see her today at lunch. She is now about 4 weeks old. Her mom was really happy with the gift and got a kick out of the fact the bear was the same size as Grace lol.

If you are interested in the pattern, here is a link to it.

Tuesday, March 21, 2017

Weekend Stitching

I got super busy yesterday and didn't get the chance to post an update of my weekend stitching. It's super short as I can't share most of it. I was invited to a Stitcher's Rendez-vous again and I used the time to work on homework for my seminar class Hedebo Enchantment. It's going very fast. I have one more round of faggot stitch to do and a satin stitch border.


I spent most of my weekend actually working on my secret project. Someone had tagged me on Instagram for what I was doing right now. Since it was the only thing I was stitching at the time, I decided to give a little taste. It was only fair I share it here as well ;) It's going very well, much faster than I was expecting which is great as I'm on a deadline. I'm aiming to finish the stitching and the "finishing" before I leave on vacation April 8. Crossing my fingers!


Last week I shared a review of Giuliana Ricama magazine and many of you mentioned looking forward to seeing my stitching. That will be happening. A project has been picked, it's just a matter of waiting for the fabric. The fabric that is used for many of the projects in the magazine is a Graziano Ricamo Linen. I've noticed in Italy, they don't identify the fabric by count but by name. Ricamo linen is actually a 45 count linen. If you are familiar with Lakeside Linens, this is the fabric they use for their 45 count hand-dyed linens. I've never worked with anything so fine, so I'm looking forward to it.

Tuesday, March 14, 2017

Pearl Butterfly Finished

This weekend, the weather was freezing cold for March so I decided to just avoid all that and stay indoors. We also had some lovely lighting giving me the opportunity to take some pretty final pictures of Pearl Butterfly.


I'm kind of sad to see this project go. It was such a joy to stitch on it and made my first goldwork experience a pleasure. There will be more goldwork in the future. At least two for sure for now and then we'll see what pops up later :)

Monday, March 13, 2017

Giuliana Ricama - A Review and How-To

Last week I promised a look into Giuliana Ricama, and here it is.


I did a comparison with a copy of Inspirations magazine and found that they are about the same size, with the Italian magazine being a tiny bit bigger, but they are about the same in thickness.


It's completely packed with projects of all types of techniques. Between the March/April 2015 and January/February 2017 issue, here's just a few of the ones that caught my eye.


In just the two issues I have with me, there are enough projects to keep me very busy. I only showed you pictures of the whitework techniques (cause that's so me), but there are way more in there.
  • Embroidery (i.e. needle painting or what I call free form)
  • Lefkara
  • Reticello
  • Tulle Embroidery
  • Needle Lace
  • Hardanger
  • Assia Embroidery
  • Aemilia Ars
  • Blackwork
  • Casaguildi
  • Macrame
  • Merletto Embroidery
  • And many more including bobbin lace based on what they have shown on their website 
They have articles showcasing embroiderers. In the January-February 2017 issue, it was with the UK embroiderer Emillie Ferris. There is also a page on new books that have come out. Typical of me, I already found a book I want to get :P If you want to know what is in each issue of Giuliana Ricama, go to this link. Click any of the covers and a new page will open allowing you to digitally flip through that issue.

Now let's talk about levels and instructions. This is probably not true of all the issues of Giuliana Ricama (the March/April 2015 issue doesn't have this), but projects are given a difficulty from easy, medium difficulty, hard, extremely hard for experts only.


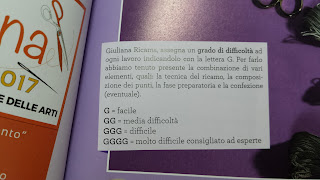
From what I've noticed most projects fall in the hard category. But let's put that aside for a minute, because as you know with proper instructions and enough determination a beginner can stitch and complete projects rated advanced. Which brings us to the second point: Instructions. European instructions are not the same as North American (we can include Australia here on account of Inspirations magazine) In English magazines, there is very little guess work. You have a list of materials and specific step by step instructions with pictures on how to stitch each portion of a project. In European magazines, if you are attempting a project targeting advanced stitches, they will assume you know how to do it and will only give the barest minimum of detail.


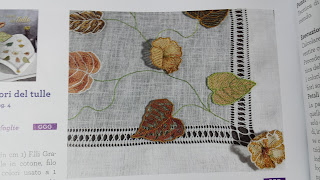
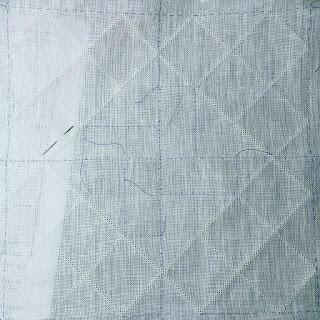
Take this project for example that my mother fell in love with it and requested. This is a table runner with a drawn thread border and a scattering of autumn leafs stitched on tulle that are attached to it. It's rated hard and there is barely a column of instructions. The only details they give you are which threads to cut for the border. For the leaves, the instructions are draw some free form leaves on parchment paper, transfer it onto tulle and stitch them. It seems that afterward, they're cut out and attached to the table runner with a stem going from one to the other. Super simple right :P

This doesn't mean there are no step by step instructions. They just prefer to keep it for the important stuff ;)


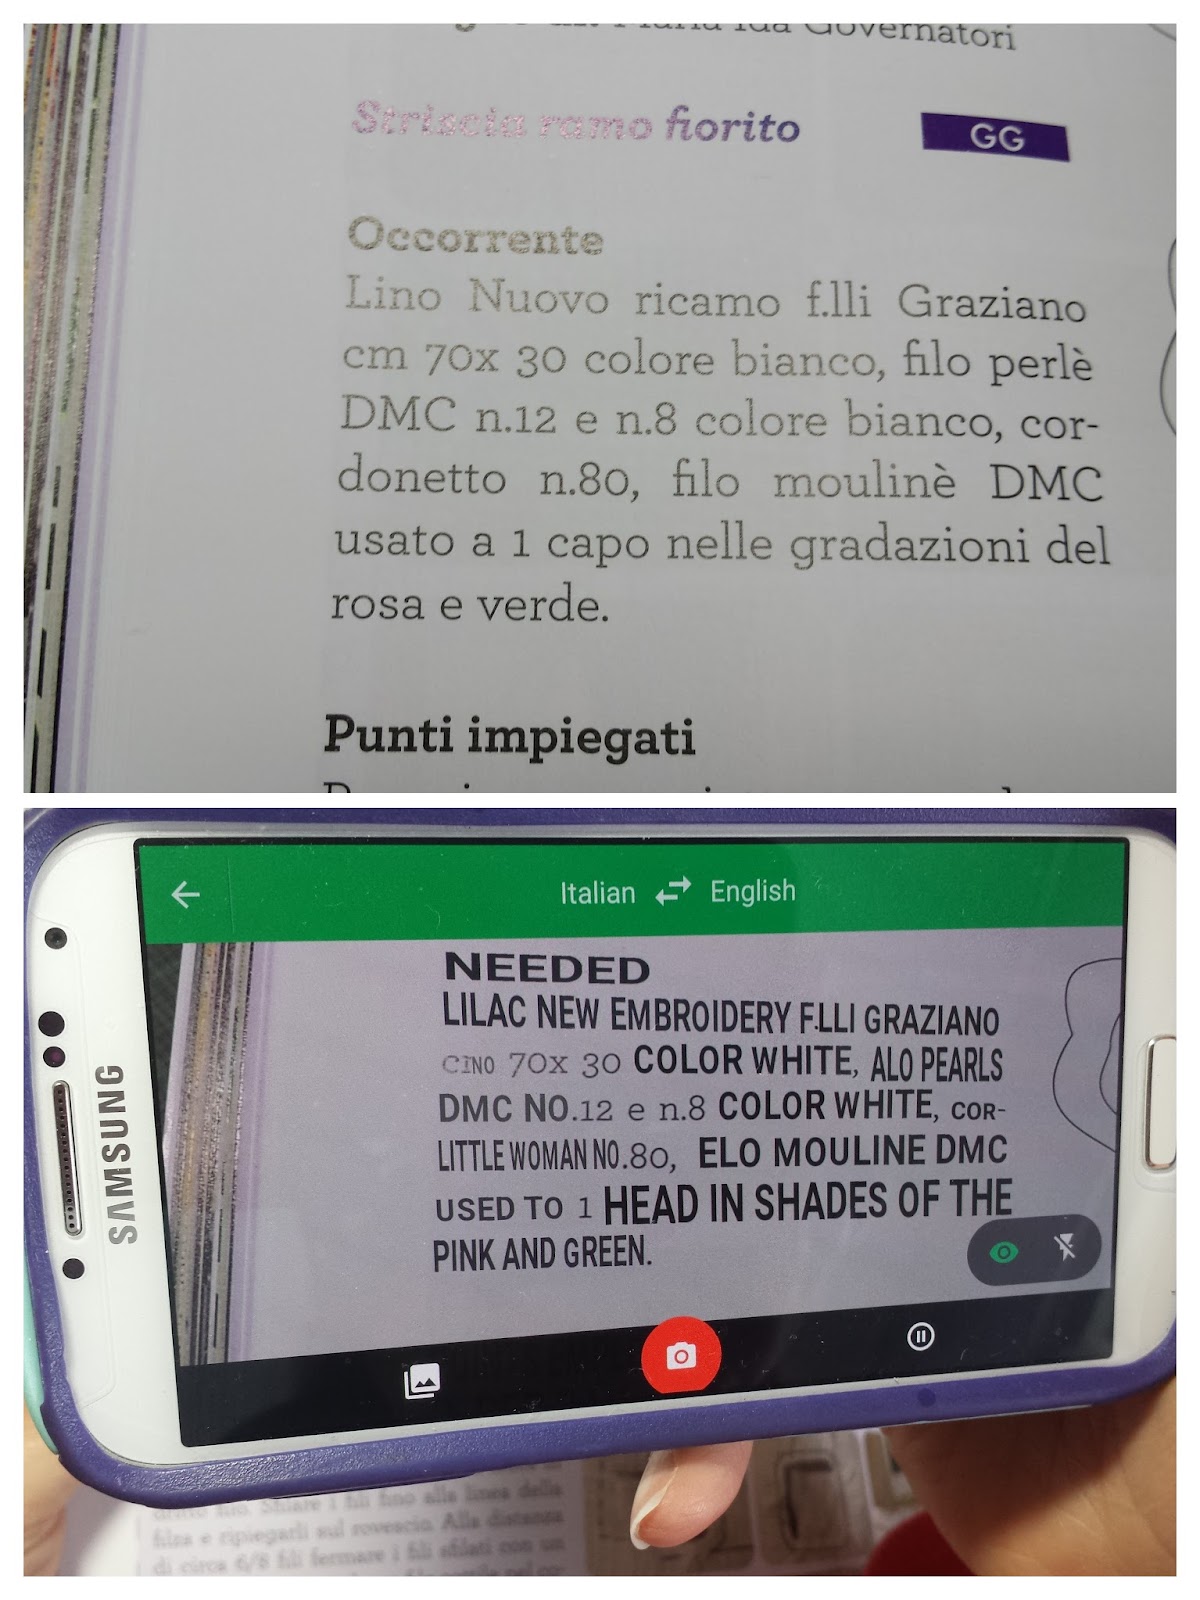
Now how did I figure all this out. What little Italian I know comes from a beginner's class in College. So I can't read Italian fluently and I'm sure many of you don't either. No worries. If you have a mobile or tablet device, Google's Translate app can help with that :)


Launch the application, configure the language you are trying to read and click the camera option. Now, you can take a picture of the text and select what you want to translate or, the faster way, simply hold the camera over the text you want to translate. Google Translate will try to translate the words. It has some trouble translating technical words that are specific to embroidery, but with a little research you can figure it out.


For example, after a bit of puzzling out, the text above turns out to be the materials list for one of the projects, another very pretty table runner:

  • Graziano is a known Italian linen. After a Google search, I found that Nuovo Ricamo is a 38 count linen (link). For this project a piece of white 70 cm x 30 cm linen is required. All measurements are in the metric system, so be careful when shopping for materials
  • DMC perle cotton #12 and 8, DMC cordonnet #80 all in white
  • DMC 6-stranded cotton in gradations of pink and green for the embroidery portion
I really want to pick a project and try my hand at stitching it to get a better idea of the instructions. I just need the time :P. For now I'm really loving this magazine. It will be a joy to read about another part of the embroidery world. I'm still waiting for an estimate of the cost but I will post an update as soon as I get it.

In other news, I got the kit for my seminar class =D more details soon.


Thursday, March 9, 2017

A Small Peek and an Unboxing

It's finished! I officially put in the last stitch on Pearl Butterfly on Tuesday. I actually skipped my Tuesday guild meeting to work on it. I just couldn't let it go. Here is a little peek. I'll take final pictures this weekend and post them next week. We're getting lots of sun, so it will show off all the glitter :)


Now onto the unboxing. I see people do this all the time online, so I'll try my hand at it today. I got some new stash yesterday from L'Atelier de Pénélope and I'm really excited to share it with you. I don't always place orders like this, so when I do I always get extra things for the future.


I got stretcher bars. I'm tired of using hoops and ending up with creases on my fabric :| These will be used for future bead and goldwork projects.


Needles for my luneville hook! I got two sizes: no. 80 and no. 90. I will start with the no. 90 using DMC #12 perle cotton and then graduate to the no. 80 . I also got DMC dentelle special thread for that. Eventually I hope to try it with an even thinner thread and beads :)


The white threads... I couldn't help it. I just happened to find a piece of fabric that is the exact size I need for Deborah Love's latest Schwalm piece Hidden Delights which was in the last issue of Inspirations. This will be what I call my garden project for those days when it's too nice to stay inside all day :) I love stitching whitework outside.


A book on Tambour embroidery. This is an excellent technical book that teaches you how to use a luneville hook. Mary Corbet has already reviewed it here. I can't wait to take a crack at it.


And the reason for my order, I finally found someone who will start carrying the magazine Giuliana Ricama =D Two years ago, Jeanine introduced us to this new magazine on her blog, but there was no way to get it. Today it is possible to buy a subscription but you'll have to pay an arm and a leg in shipping fees. So I'm really excited someone so close to home will start carrying it. I'm still looking over the two issues I got and I'll post all the details and an inside look on Monday. It is gorgeous!


Monday, March 6, 2017

Pearl Butterfly Lesson 4

Because lesson 3 was so short, Alison was kind enough to release the final lesson for Pearl Butterfly a week ahead of time. And there is LOTS to do!

Before jumping into it, here is a picture of Pearl Butterfly in the sun. Saturday morning we had such great lighting :) I can't get over how beautiful these colors look together under the natural light.


My butterfly finally got a head and antennas. The antennas are Gilt Super Pearl Purl which is very similar to the Gilt Pearl Purl #2 I had used to stitch the wings outline.


The next step was the thorax of the butterfly, but I decided to skip to the S'ing. I got to play with Gilt Rough Purl. It's very slinky and slippery.


I had to cut a whole lot of these tiny purls. These are 5mm, so small! It was very hard not to tense up every time I cut them. I can't tell you how many times I had to force myself to relax my shoulders from my neck lol. These will be threaded onto the needle and used like beads.


But before that I had to fix some bead spacing issues. I noticed that one of the rows of pearls in the upper right wing wasn't correctly centered, so I snipped them out and restitched them.


If I hadn't done that there would have been a really big yellow space between the S'ing and white silk. This second time around is much better :)


S'ing is fun once you get into a nice rhythm. Just make sure you cut enough rough purl so you don't get interrupted.


From this point forward, I lost the light :( So pictures are much darker, but you can still see the S'ing is completed. I decided not to cut off my thread since I have to work in those areas anyways. Don't worry, I made sure to make two small stitches to finish that area off ;)


So far Goldwork seems very easy. Until you get to this particular technique in goldwork: cutting lengths to the right size and applying them like beads. For this part we're using the Bright Check Purl but different kinds of metals can be used.


I found this part hard. The check purl couldn't be too long because then you will have a bridge, too short and you'll have a gap on one side. I'm still not 100% happy with it (I'm talking about the third purl from the bottom), but it will do. The great thing about using check purl is any bits that weren't good enough I could use for this next part.


Chipping! This is the part I've been looking forward to the most. It's basically seed beading and instead of stitching with beads we're using check purl. By the time I got to this part, I could only do this small section as it was getting late. I stitched on this piece ALL day! I didn't feel the time pass.


The next time you'll see Pearl Butterfly, it will most likely be finished. All that's left is the chipping and one final technique before it will be all over and I'll have to move onto another project. I'm already looking into my next goldwork project. I want to make a trio of goldwork to hang in the living room. So far I have my choices narrowed down to a flower and a landscape. I already got the kit for the flower, just have to get fabric for it.

Thursday, March 2, 2017

Pillow and Tools

My friend Carolyn does bobbin lace. When I told her I was going to come down south for a visit, she asked me for a favor. She wanted a pillow, not just any pillow but a Simon Toustou pillow for bobbin lace. Now Simon doesn't speak English, so I agreed to act as a go between for Carolyn so she can place her order. I figured I'd share pictures here for those who are curious on what it looks like.


There are different versions of the pillow you can get. You can get just a flat pillow (in different sizes) or do what Carolyn did and get it with the roller at the top. That roller allows you to make lace edgings. Simon has different options for the velvet and the wood. This particular pillow is 22" (still no idea how I'm going to carry it) with a 6" roller and the wood Carolyn went with was cherry wood.


 The pillow has 3 drawers that are lined with the same velvet. What's this!?


Did I forget to mention I placed my own order with Simon. I saw these when I went to Nicolet last summer and always said if I got any embroidery tools I'd get them handmade. Simon is actually the vendor who told me the story of the fuseaux de marrié. So from left to right: Luneville, piquoir mandarin (or pricker), stiletto, stylus, stitch fixer and Hedebo. Except for the Hedebo which is cherry wood, the rest are all made from rosewood. Most of these tools are made for bobbin lace makers in mind but they easily work very well for other embroidery techniques.


I've been wanting to try the luneville ever since learning all about bead embroidery. In the majority of fashion houses, beading is done with this tiny needle that is more like a tiny crochet hook. Now mine doesn't have a needle quite yet. I'm still waiting for it, but I'm looking forward to playing with it this summer.


A piquoir mandarin is actually a pricker. There were two versions of it, but I decided to go with the one that allows me to change the needle. The gold cap at the head unscrews so you can take the needle out. This tool will be great for transfer designs using the prick and pounce method.


I found that while transferring designs, a stylus is key. I've tried using a regular pencil (when I could find one, haven't we all just switched to mechanical by now?) and I'm always afraid of pressing too hard and piercing through the design. This stylus has a rounded tip at the end to prevent that.


A stiletto with bone at one end, cause it's pretty :P But I'm sure I'll find some use for it.


The stitch fixed is mainly designed for bobbin lace. What I really wanted was the fork end, it would be great for shoving thread back into place.


And at last the Hedebo stick. Isn't it pretty? Hedebo embroidery has a lot of rings in it and this tapered stick is used to make sure the size are consistent. Here is a video showing how it's used. You can also use it for other things like tatting. It should prove very useful when I start my seminar class on Hedebo embroidery.


By the way I got fabulous news, Alison messaged me and she will be uploading Pearl Butterfly lesson 4 Friday night. That's Australian time, so for me that would mean tomorrow morning I can download the new lesson at work and be ready to start stitching as soon as I get home =D I'm so happy I don't have to wait another week!